What's a Droplet?
Taken literally, a droplet is a small drop of liquid. Thanks to DigitalOcean, it's now also a clever joke about cloud computing that I only recently got. Here we're running with this new definition: a droplet is a Linux-based virtual machine offered by DigitalOcean.
For background, see this nice overview by Adarsh Sojitra.
Generally, this discussion will apply to any Linux-based virtual machine where you might use IO, but we'll stick with DigitalOcean for this example because it offers an affordable, easy-to-use service that just might be the least scary way to get started in the cloud.
Why use IO?
Recalling our discussion of homelabs, IO can provide capability, safety, and convenience for your droplet.
Capability. You want to run one or more services and make them publicly available on the internet. These can be websites or APIs that work over HTTP or HTTPS (this includes gRPC).
Safety. You want to use HTTPS to connect to your services. You want to require authentication for some or all of your services. You want to be able to block bad traffic to your services.
Convenience. You want to be able to easily configure and manage your services. You want to observe the traffic to and from your services.
Create a droplet
We'll use the smallest size droplet for this example.

When you're creating your droplet, add an SSH public key and take a minute to pick a custom name (the defaults are hard to remember). I'm picking names from the NATO phonetic alphabet; this one is "mike".
Once your droplet is created, you'll see an option to add a reserved IP address. There's no cost for this, so it's worth doing. With a reserved IP address, you can easily reassign your address to another droplet if you decide to change your backend instance.
Configure your domain
You should have a domain that you can point at your droplet. Ideally, the DNS for your domain would be configured with two DNS "A" records. The first one (below) routes your root domain to your droplet, and the second routes all subdomains to your droplet.
Set these records to your reserved IP address.
A	@	[YOUR-IP-ADDRESS]
A	*	[YOUR-IP-ADDRESS]
For these examples, I'm using the domain "noted.at".
When your domain records have propagated, you should be able to connect to your droplet with SSH:
$ ssh noted.at -l root
Warning: Permanently added 'noted.at' (ED25519) to the list of known hosts.
Welcome to Ubuntu 24.10 (GNU/Linux 6.11.0-9-generic x86_64)

 * Documentation:  https://help.ubuntu.com
 * Management:     https://landscape.canonical.com
 * Support:        https://ubuntu.com/pro

 System information as of Tue Jun 10 21:14:41 UTC 2025

  System load:  0.01              Processes:             103
  Usage of /:   7.8% of 23.10GB   Users logged in:       0
  Memory usage: 19%               IPv4 address for eth0: 64.23.153.13
  Swap usage:   0%                IPv4 address for eth0: 10.48.0.7

180 updates can be applied immediately.
105 of these updates are standard security updates.
To see these additional updates run: apt list --upgradable


The programs included with the Ubuntu system are free software;
the exact distribution terms for each program are described in the
individual files in /usr/share/doc/*/copyright.

Ubuntu comes with ABSOLUTELY NO WARRANTY, to the extent permitted by
applicable law.
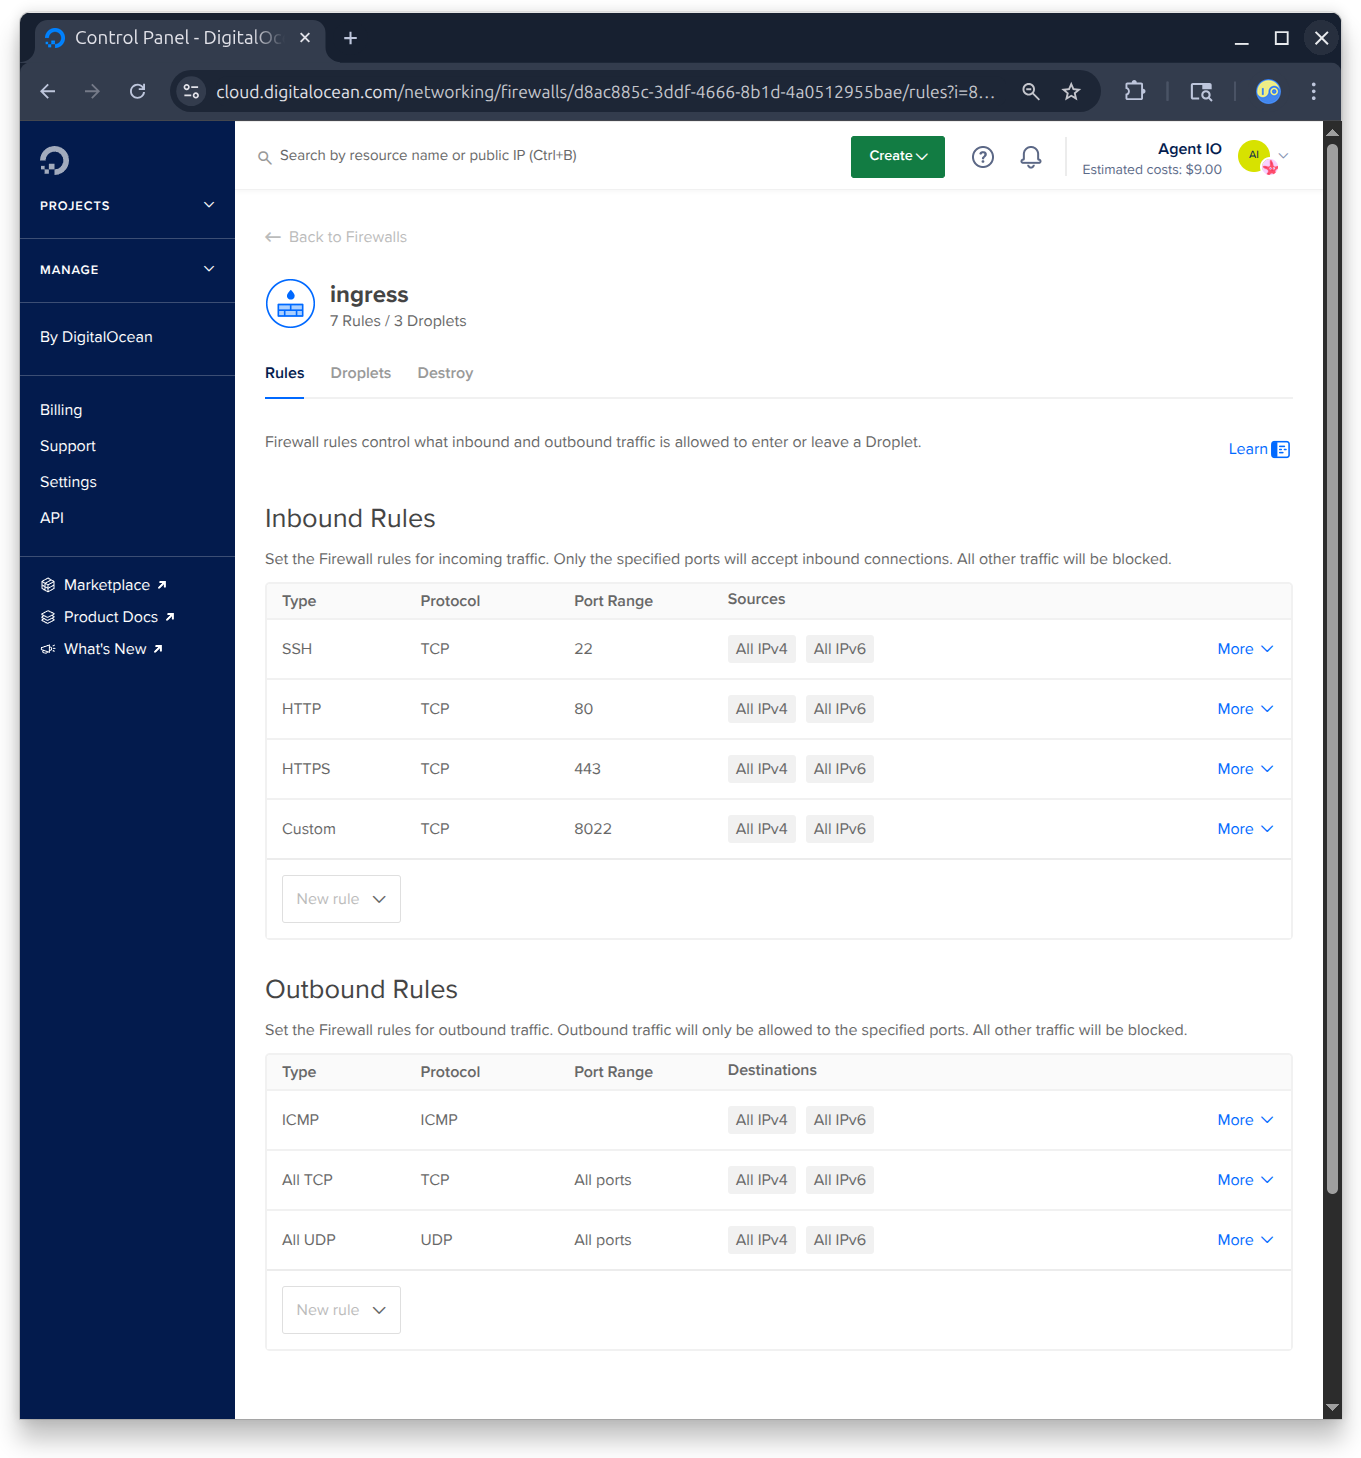
Create a firewall
This is very important! IO creates a bunch of ports that your internal services will use. It also listens on three ports that should be open to the outside world (80, 443, and 2200).
You should configure your droplet firewall to ONLY allow access to these ports:
- 80 and 443 to allow HTTP and HTTPS access
- 2200 to allow remote SSH connections to your IO
- and 22 to allow remote SSH connections to your machine
Note that you could leave ports 22 and 2200 closed if you install a VPN like Tailscale in your droplet (but we won't in this discussion).
Here's the firewall configuration that I'm using:
Install Docker
First let's install Docker. Use SSH to sign into your droplet and save this as DOCKER.sh:
#!/bin/sh
#
# This follows the instructions in Docker's "Install Docker Engine on Ubuntu"
#  https://docs.docker.com/engine/install/ubuntu/#install-using-the-repository
#

# Add Docker's official GPG key:
sudo apt-get update
sudo apt-get install ca-certificates curl -y
sudo install -m 0755 -d /etc/apt/keyrings
sudo curl -fsSL https://download.docker.com/linux/ubuntu/gpg -o /etc/apt/keyrings/docker.asc
sudo chmod a+r /etc/apt/keyrings/docker.asc

# Add the repository to Apt sources:
echo \
  "deb [arch=$(dpkg --print-architecture) signed-by=/etc/apt/keyrings/docker.asc] https://download.docker.com/linux/ubuntu \
  $(. /etc/os-release && echo "${UBUNTU_CODENAME:-$VERSION_CODENAME}") stable" | \
  sudo tee /etc/apt/sources.list.d/docker.list > /dev/null
sudo apt-get update

# Install Docker CE
sudo apt-get install docker-ce -y
Now run it:
$ sh DOCKER.sh
When it finishes, you can verify your docker installation with docker info. Here's what I got:
root@mike:~# docker info
Client: Docker Engine - Community
 Version:    28.2.2
 Context:    default
 Debug Mode: false
 Plugins:
  buildx: Docker Buildx (Docker Inc.)
    Version:  v0.24.0
    Path:     /usr/libexec/docker/cli-plugins/docker-buildx
  compose: Docker Compose (Docker Inc.)
    Version:  v2.36.2
    Path:     /usr/libexec/docker/cli-plugins/docker-compose

Server:
 Containers: 0
  Running: 0
  Paused: 0
  Stopped: 0
 Images: 0
 Server Version: 28.2.2
 Storage Driver: overlay2
  Backing Filesystem: extfs
  Supports d_type: true
  Using metacopy: false
  Native Overlay Diff: true
  userxattr: false
 Logging Driver: json-file
 Cgroup Driver: systemd
 Cgroup Version: 2
 Plugins:
  Volume: local
  Network: bridge host ipvlan macvlan null overlay
  Log: awslogs fluentd gcplogs gelf journald json-file local splunk syslog
 CDI spec directories:
  /etc/cdi
  /var/run/cdi
 Swarm: inactive
 Runtimes: io.containerd.runc.v2 runc
 Default Runtime: runc
 Init Binary: docker-init
 containerd version: 05044ec0a9a75232cad458027ca83437aae3f4da
 runc version: v1.2.5-0-g59923ef
 init version: de40ad0
 Security Options:
  apparmor
  seccomp
   Profile: builtin
  cgroupns
 Kernel Version: 6.11.0-9-generic
 Operating System: Ubuntu 24.10
 OSType: linux
 Architecture: x86_64
 CPUs: 1
 Total Memory: 961MiB
 Name: mike
 ID: a0f33553-d74f-40d8-892d-da52fab2e0c6
 Docker Root Dir: /var/lib/docker
 Debug Mode: false
 Experimental: false
 Insecure Registries:
  ::1/128
  127.0.0.0/8
 Live Restore Enabled: false
Install Nomad
Now let's install Nomad. Save the following to a file named NOMAD.sh:
#!/bin/sh
#
# This follows the instructions in Hashicorp's "Install Nomad"
#  https://developer.hashicorp.com/nomad/docs/install
#

# Install required packages.
sudo apt-get update && \
  sudo apt-get install wget gpg coreutils -y

# Add the Hashicorp GPG key.
wget -O- https://apt.releases.hashicorp.com/gpg | \
  sudo gpg --dearmor -o /usr/share/keyrings/hashicorp-archive-keyring.gpg

# Add the official HashiCorp Linux repository.
echo "deb [signed-by=/usr/share/keyrings/hashicorp-archive-keyring.gpg] https://apt.releases.hashicorp.com $(lsb_release -cs) main" \
| sudo tee /etc/apt/sources.list.d/hashicorp.list

# Update and install Nomad.
sudo apt-get update && sudo apt-get install nomad -y
Now run it:
$ sh NOMAD.sh
When that finishes, you can confirm that nomad was installed by running nomad with no arguments:
root@mike:~# nomad
Usage: nomad [-version] [-help] [-autocomplete-(un)install] <command> [args]

Common commands:
    run         Run a new job or update an existing job
    stop        Stop a running job
    status      Display the status output for a resource
    alloc       Interact with allocations
    job         Interact with jobs
    node        Interact with nodes
    agent       Runs a Nomad agent

Other commands:
    acl                 Interact with ACL policies and tokens
    action              Run a pre-defined command from a given context
    agent-info          Display status information about the local agent
    config              Interact with configurations
    deployment          Interact with deployments
    eval                Interact with evaluations
    exec                Execute commands in task
    fmt                 Rewrites Nomad config and job files to canonical format
    license             Interact with Nomad Enterprise License
    login               Login to Nomad using an auth method
    monitor             Stream logs from a Nomad agent
    namespace           Interact with namespaces
    operator            Provides cluster-level tools for Nomad operators
    plugin              Inspect plugins
    quota               Interact with quotas
    recommendation      Interact with the Nomad recommendation endpoint
    scaling             Interact with the Nomad scaling endpoint
    sentinel            Interact with Sentinel policies
    server              Interact with servers
    service             Interact with registered services
    setup               Interact with setup helpers
    start               Start a stopped job
    system              Interact with the system API
    tls                 Generate Self Signed TLS Certificates for Nomad
    ui                  Open the Nomad Web UI
    var                 Interact with variables
    version             Prints the Nomad version
    volume              Interact with volumes
Configure Nomad
We need to configure Nomad before we start it. We're going to configure a very simple cluster: just one node that's both a Nomad client and server (you can look up those definitions later).
Replace the /etc/nomad.d/nomad.hcl in your droplet with this:
data_dir  = "/opt/nomad/data"
bind_addr = "0.0.0.0"

server {
  enabled          = true
  bootstrap_expect = 1
  heartbeat_grace  = "1m"
}

client {
  enabled = true
  servers = ["127.0.0.1"]

  host_volume "io" {
    path = "/srv/nomad/io"
    read_only = false
  }
}
This configuration creates some storage for IO in what Nomad calls a "host volume". For this to work, you'll need to also create this directory on your droplet.
mkdir -p /srv/nomad/io
Start Nomad
Now you can start Nomad. Do that by running the systemctl enable subcommand on your droplet, which will cause Nomad to restart whenever your droplet reboots. Here we add the --now option to also start Nomad now.
systemctl enable --now nomad
If that worked, you can now run nomad agent-info to get details about your running cluster.
Run IO with Nomad
Our next step is to set up an an IO that will manage this droplet's HTTP and HTTPS connections.
We're going to run this IO with Nomad.
Before starting it, you'll need to have an io.db in /srv/nomad/io that is initialized with your license key and SSH users. You can create the io.db by running IO locally. Here license.hcl contains your license key and users.hcl contains the user configuration (see Add an SSH key to allow remote login for an example of users.hcl).
# Do this on your local system!
IO.sh -c license.hcl -c users.hcl -x
When that's done, copy your io.db to the /srv/nomad/io directory on your droplet
$ scp io.db root@noted.at:/srv/nomad/io
io.db
Now we need to tell Nomad to run IO. We do that with a Nomad job description that is also represented in HCL (both IO and Nomad use HCL for configuration).
Here's the Nomad job description that we need to run IO. Save it in a file named io.hcl and copy it to your droplet.
job "io" {
  datacenters = ["dc1"]
  type = "service"
  group "io" {
    count = 1
    service {
      name = "io"
      provider = "nomad"
    }
    volume "io" {
      type      = "host"
      read_only = false
      source    = "io"
    }
    task "io" {
      driver = "docker"
      config {
        image = "agentio/io:latest"
        network_mode = "host"
        force_pull = true
      }
      volume_mount {
        volume = "io"
        destination = "/io"
        read_only = false
      }
    }
  }
}
Now, on your droplet, use nomad job run to start your job.
root@mike:~# nomad job run io.hcl

==> View this job in the Web UI: http://127.0.0.1:4646/ui/jobs/io@default

==> 2025-06-10T22:04:03Z: Monitoring evaluation "e98343ac"
    2025-06-10T22:04:03Z: Evaluation triggered by job "io"
    2025-06-10T22:04:03Z: Allocation "222aa15d" created: node "5892cb5c", group "io"
    2025-06-10T22:04:04Z: Evaluation within deployment: "282f379d"
    2025-06-10T22:04:04Z: Evaluation status changed: "pending" -> "complete"
==> 2025-06-10T22:04:04Z: Evaluation "e98343ac" finished with status "complete"
==> 2025-06-10T22:04:04Z: Monitoring deployment "282f379d"
  ✓ Deployment "282f379d" successful

    2025-06-10T22:04:22Z
    ID          = 282f379d
    Job ID      = io
    Job Version = 0
    Status      = successful
    Description = Deployment completed successfully

    Deployed
    Task Group  Desired  Placed  Healthy  Unhealthy  Progress Deadline
    io          1        1       1        0          2025-06-10T22:14:21Z
root@mike:~#
If all goes well, you'll be able to see your IO running in Docker.
root@mike:~# docker ps
CONTAINER ID   IMAGE               COMMAND                  CREATED          STATUS          PORTS     NAMES
18afc1bcd498   agentio/io:latest   "/usr/local/bin/io io"   49 seconds ago   Up 49 seconds             io-222aa15d-da7d-339f-f49d-63babe2cf7b9
Connect to IO
With an IO up and running on your droplet, you should now be able to connect remotely to it. Try this on your local machine (one where your SSH private key is installed):
ssh -p 2200 noted.at
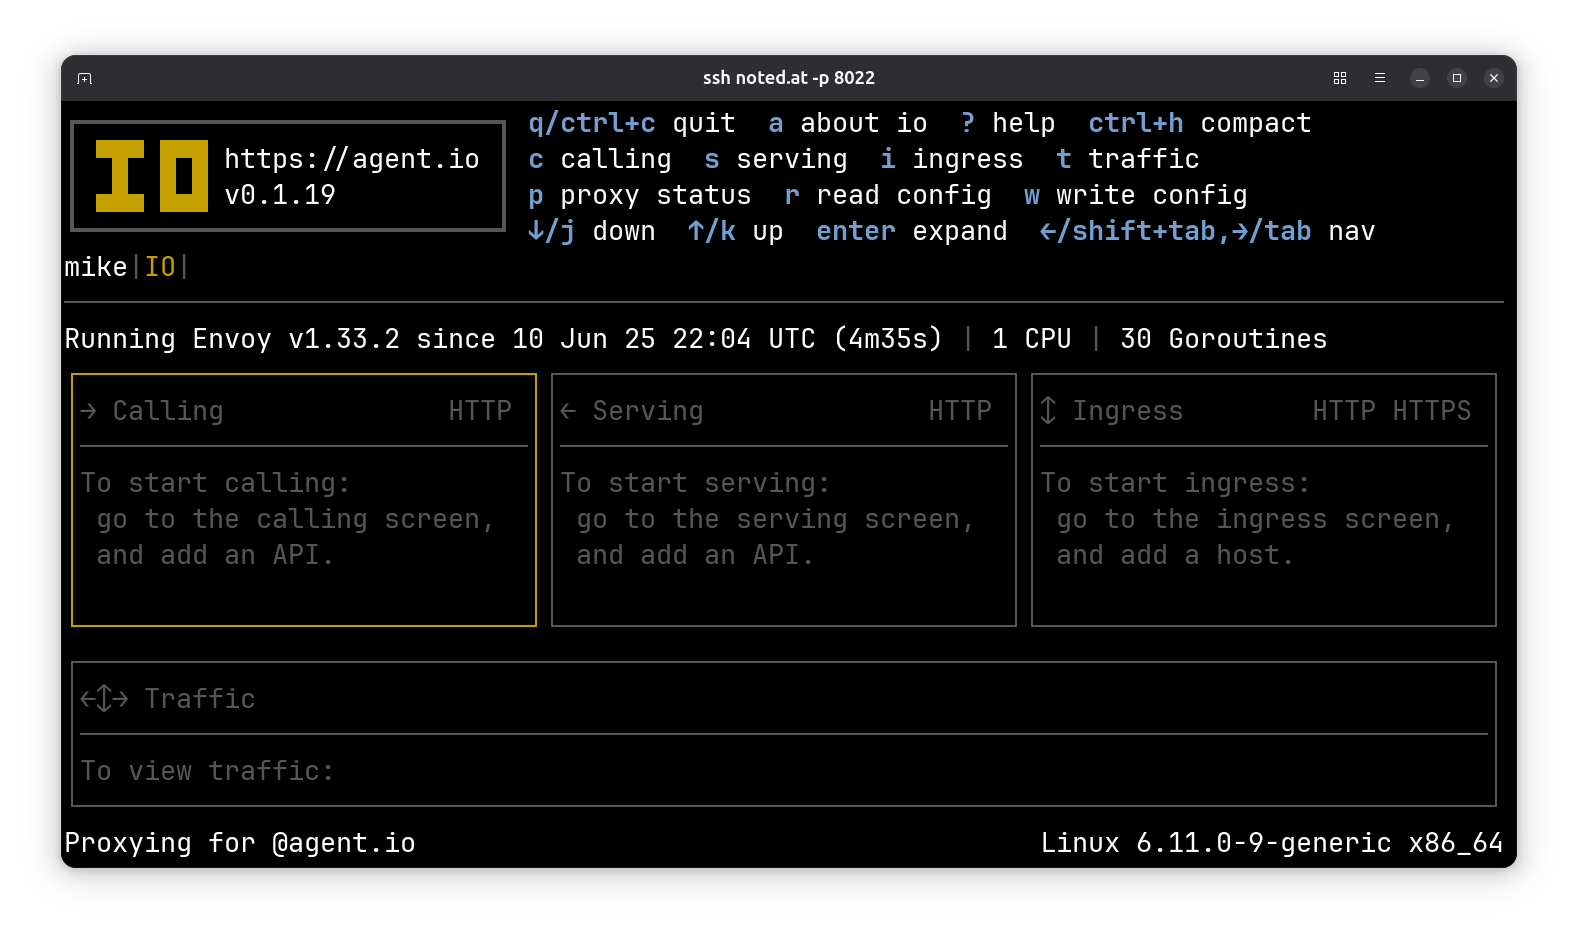
If all goes well, you'll see the IO console:
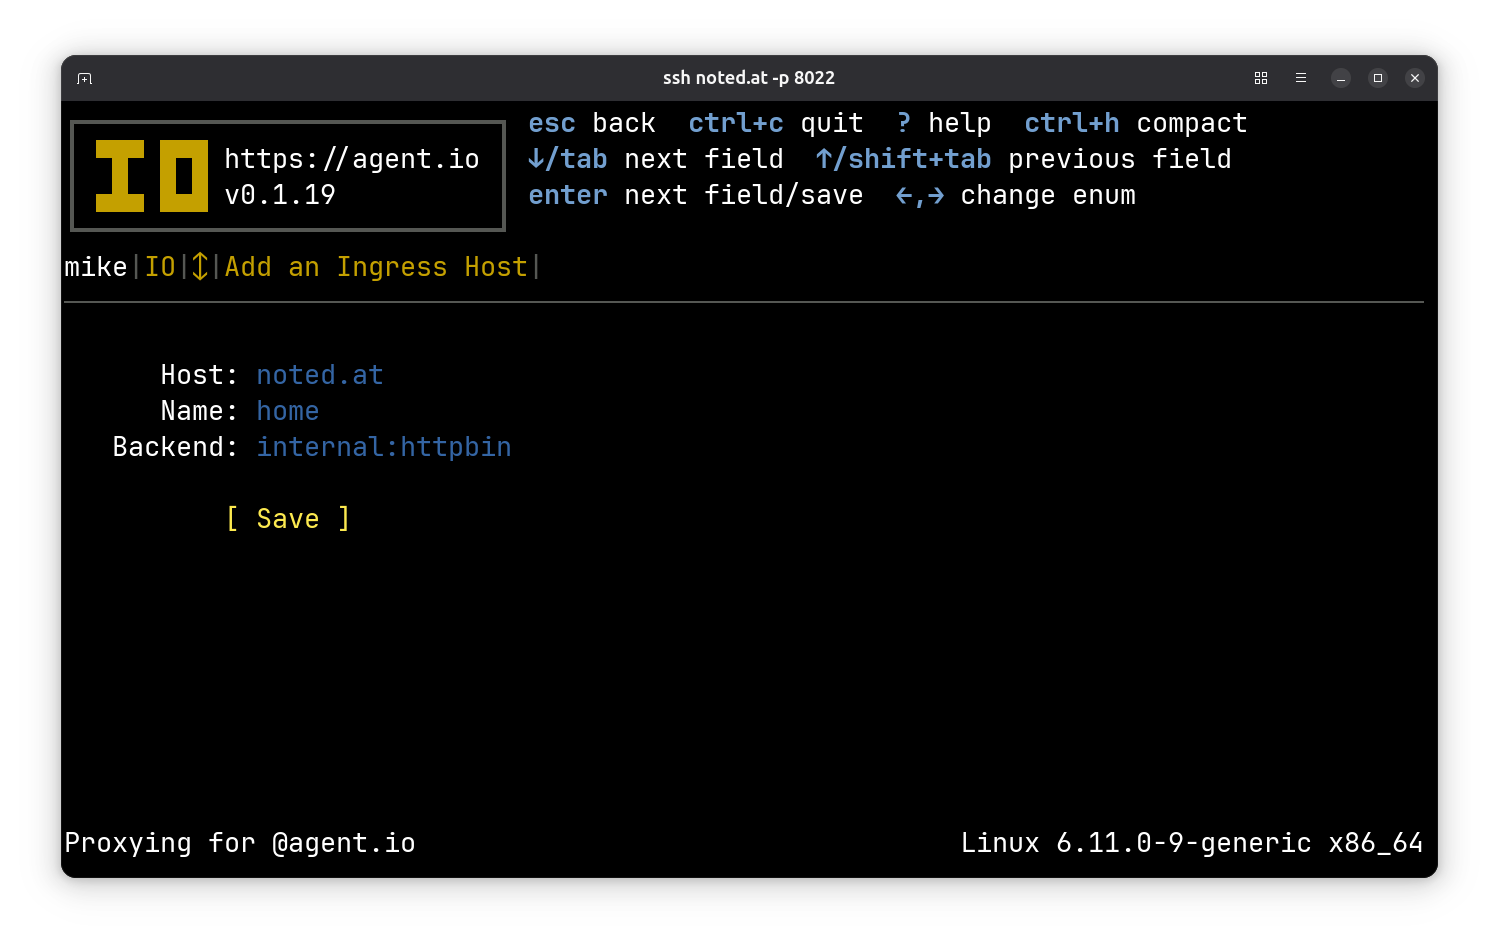
Create your first ingress
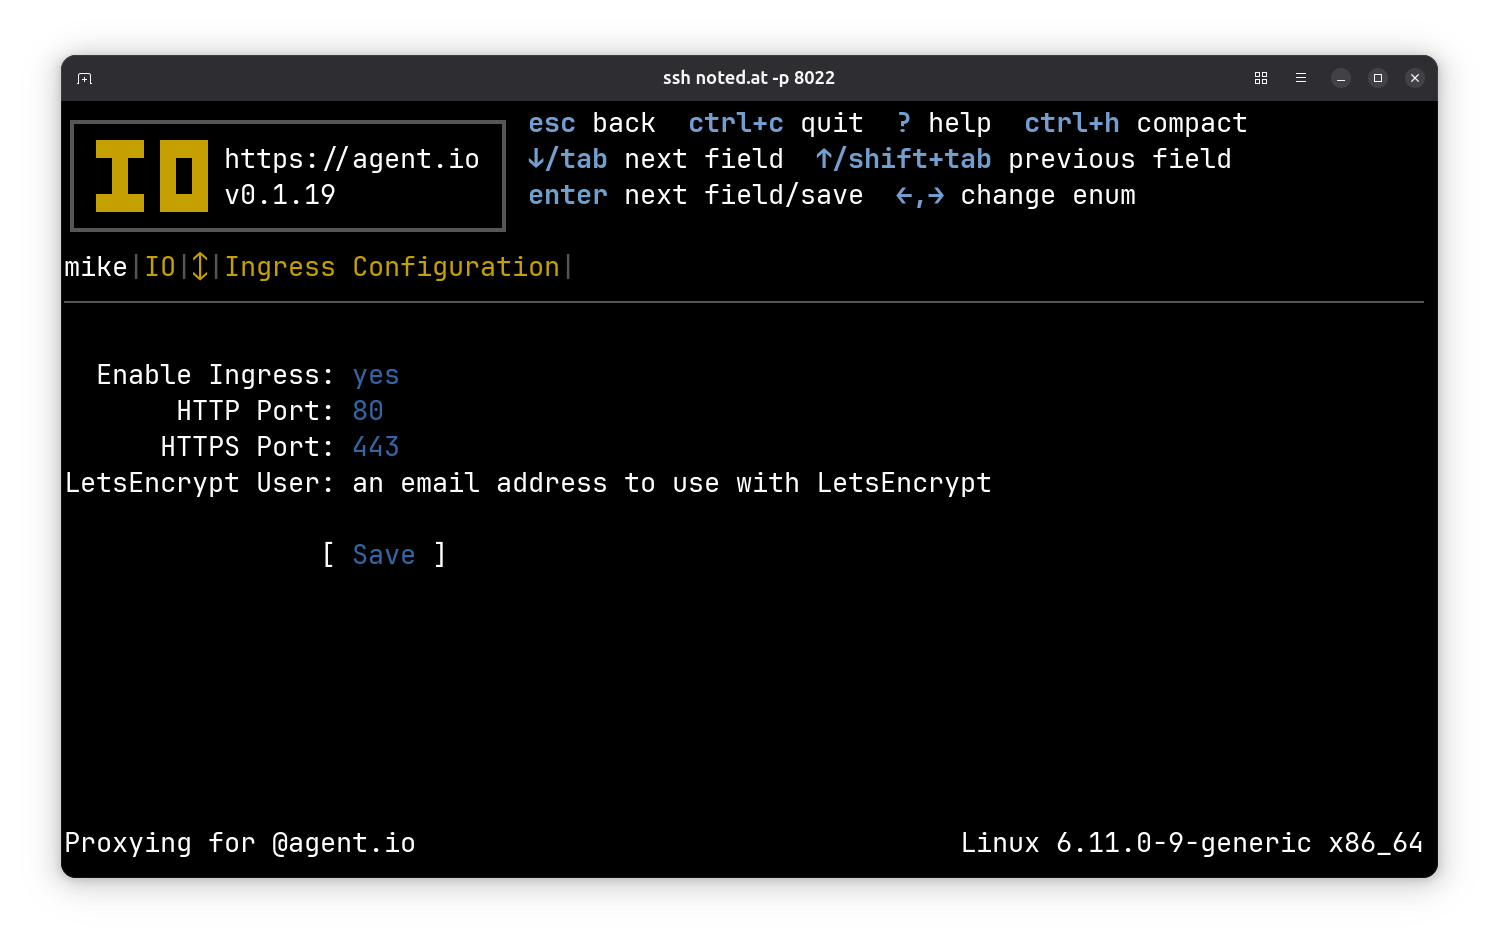
Now for fun, let's set up a service on your droplet and give it an IO ingress. From the IO home screen, press i to go to the ingress screen and press n to create a new ingress. Set the host to your droplet's domain. The name can be any user-friendly name, and the backend should be internal:httpbin. This tells your ingress to serve a version of HTTPBin that is built into IO for testing.
When that's saved, you should see a view of your ingress like this:
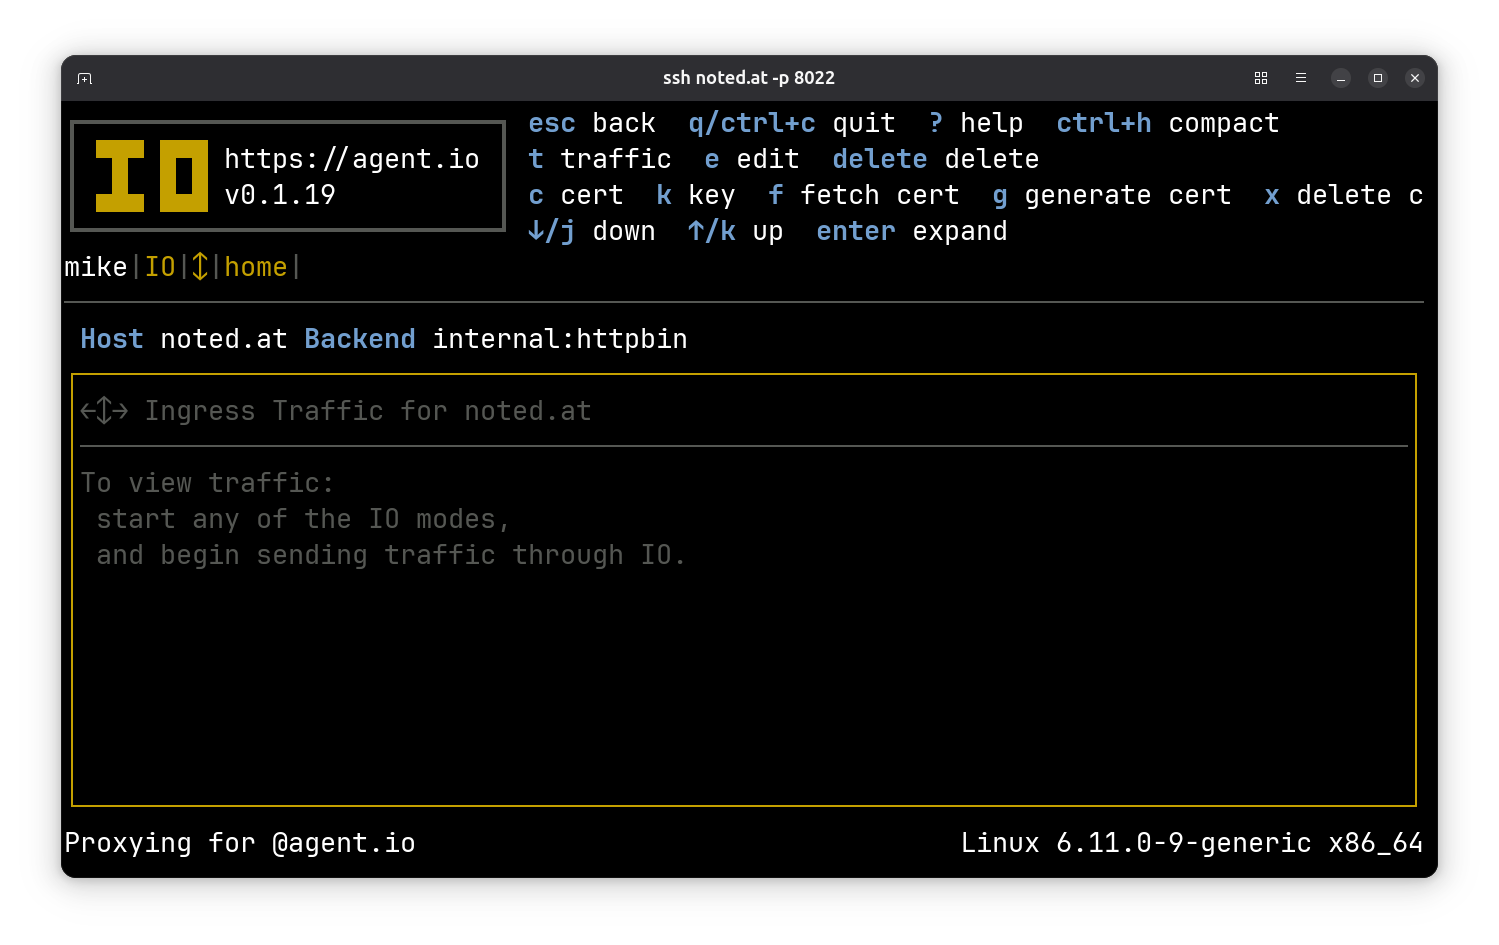
We need an SSL certificate for this ingress. Before we can request one, we need to set a contact email address for LetsEncrypt. Go up a level (press ESC) to the ingress overview screen and press e to edit your general ingress configuration. Tab down to the LetsEncrypt User field and enter your email address. Press tab again and then enter to save this.
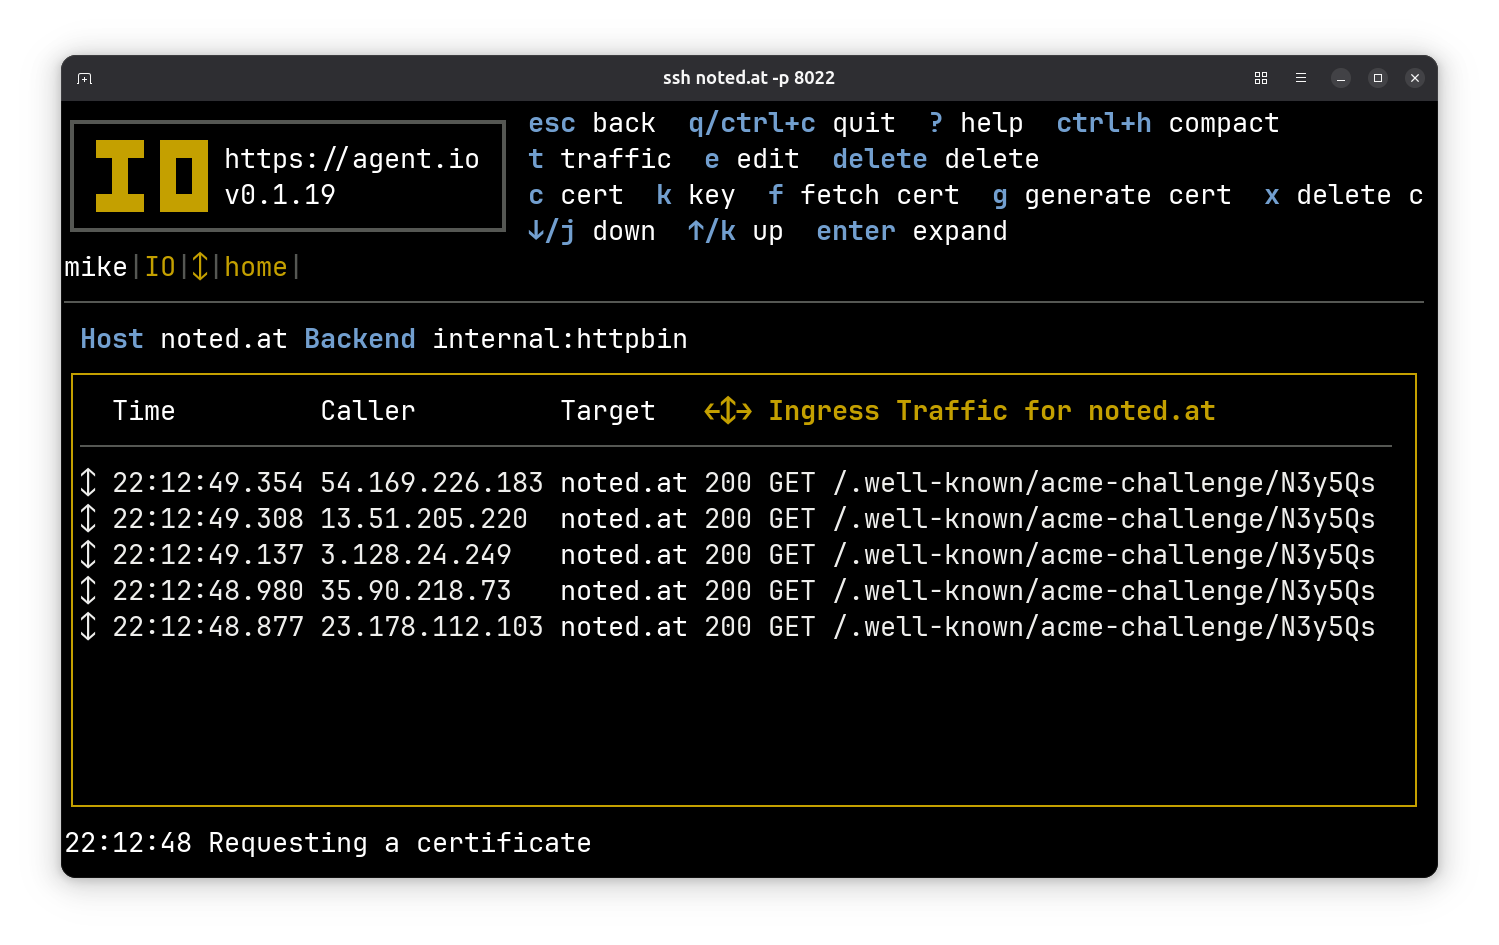
Now go back to the detail view of your new ingress and press f to "fetch" a certificate from LetsEncrypt. You'll see challenge requests appearing in the traffic screen.
After a minute or so, you'll see a message at the bottom confirming that your certificate was generated.
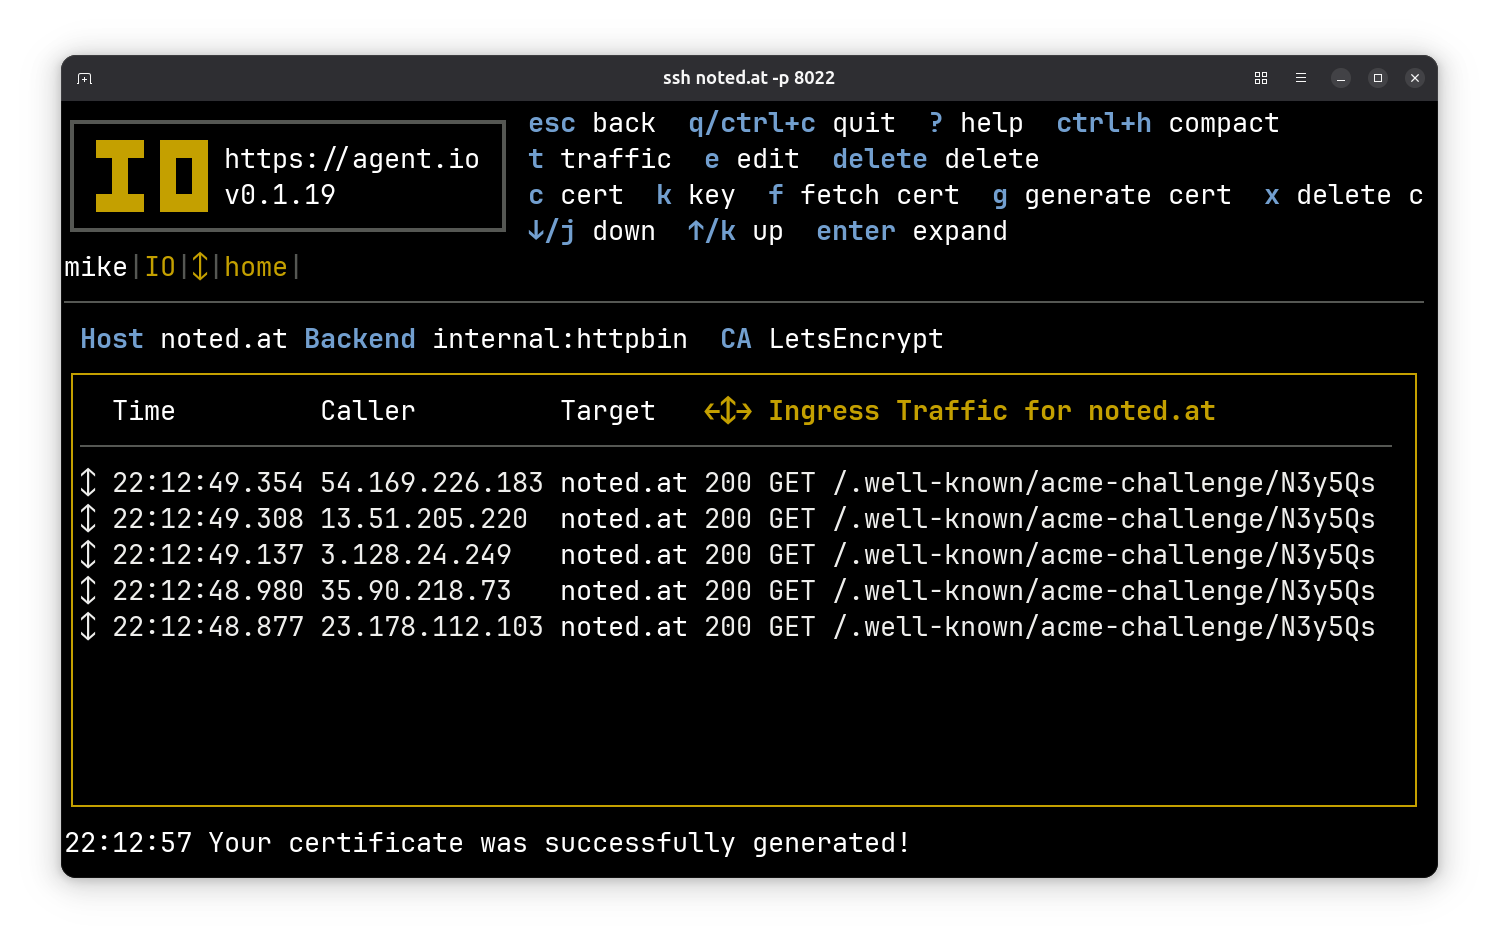
Now grab your web browser and visit your droplet domain. You should get the go-httpbin main screen.

Congratulations! You now have droplet-publishing superpowers!
Securely connect to your Nomad console with IO
For one more trick, we're going to use IO to set up a secure ingress to your Nomad console. Here's the IO configuration:
serve "nomad" {
  name    = "Nomad"
  port    = 9009
  backend = "127.0.0.1:4646"
  require_atproto {
    handles = ["timburks.me"]
  }
}

host "nomad.noted.at" {
  name    = "Nomad"
  backend = "serving:nomad"
  atproto {
    name   = "Nomad"
    scopes = ["atproto"]
  }
}
The first block declares a serving interface that points to your droplet's Nomad console and republishes it on port 9009. It also adds an authorization requirement: only AT Protocol users with handles in this handles list will be allowed to connect. Change this to include your handle (and take mine out of it!).
The next block declares an ingress for the specified host. Here you should replace nomad.noted.at with some subdomain of your droplet's domain. This ingress includes a block that tells IO to handle AT Protocol signin for this host. The name field will be used in the client id. We only need the atproto scope because we are just asking for a user's identity.
Save the modified version of this file on your local system (yes, really) as nomad.hcl and then copy it to your IO with SCP.
$ scp -P 2200 nomad.hcl noted.at:
nomad.hcl                                                 100%  273    14.1KB/s   00:00
(Cool, huh? You just uploaded a new configuration using SCP.)
Go back to the IO console and get an SSL certificate for your new host.
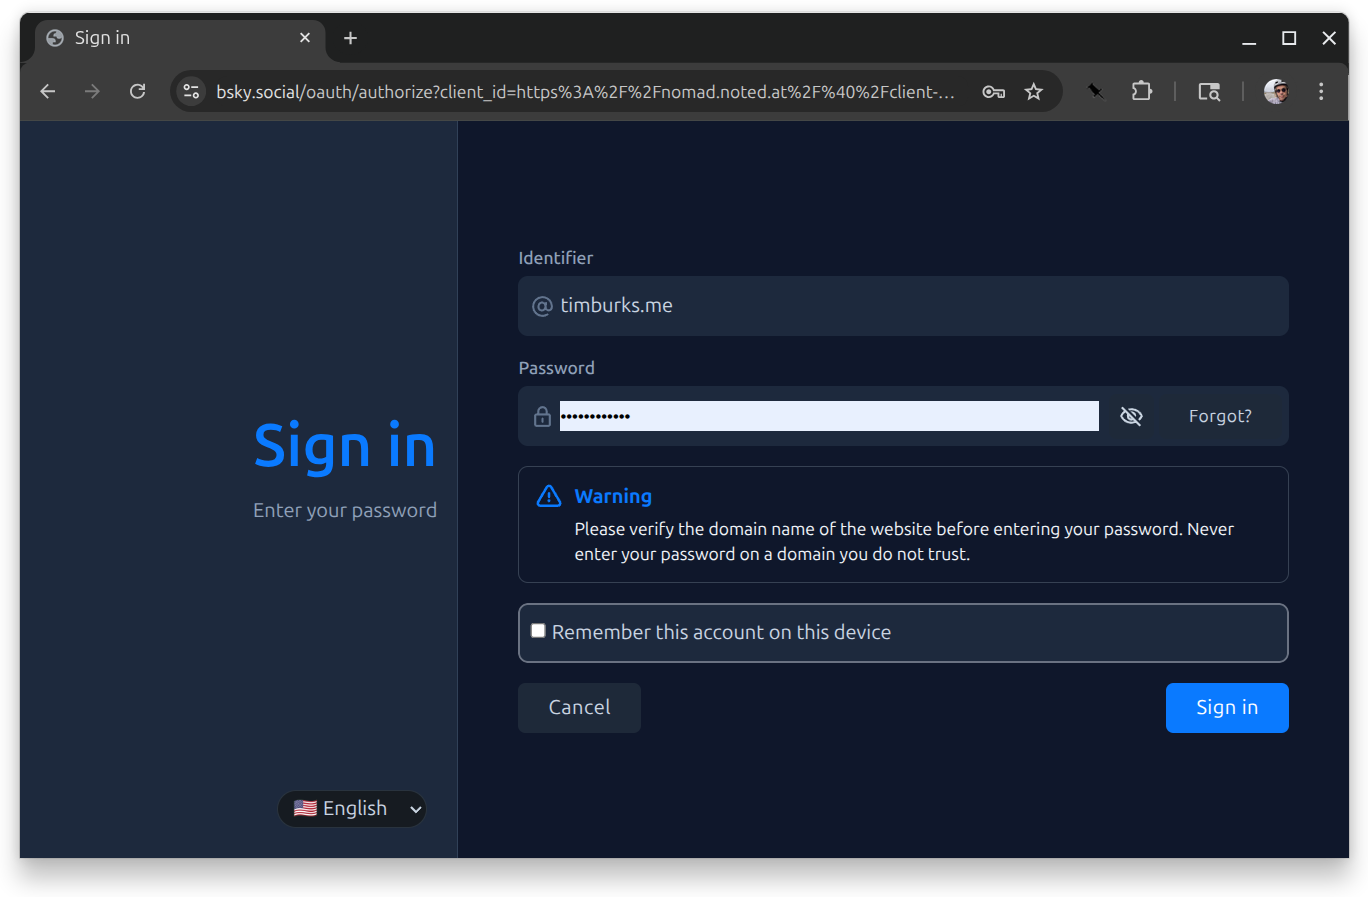
After that, when you try to connect to your new subdomain, you'll be redirected to an AT Protocol signin screen.
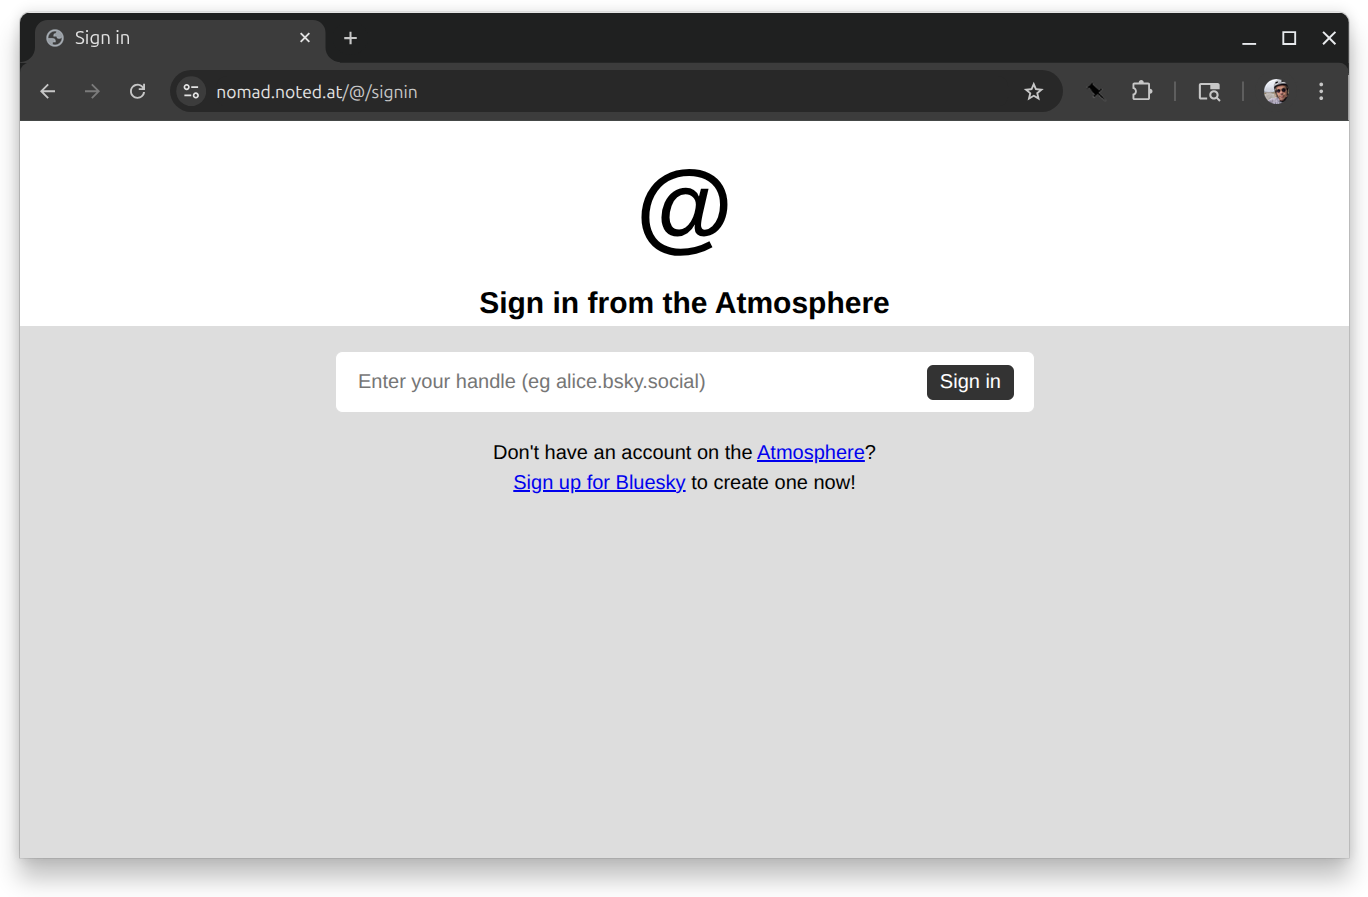
When you type in your handle and press enter, you'll be redirected to your PDS to sign in.
From there you'll go to an authorization screen.
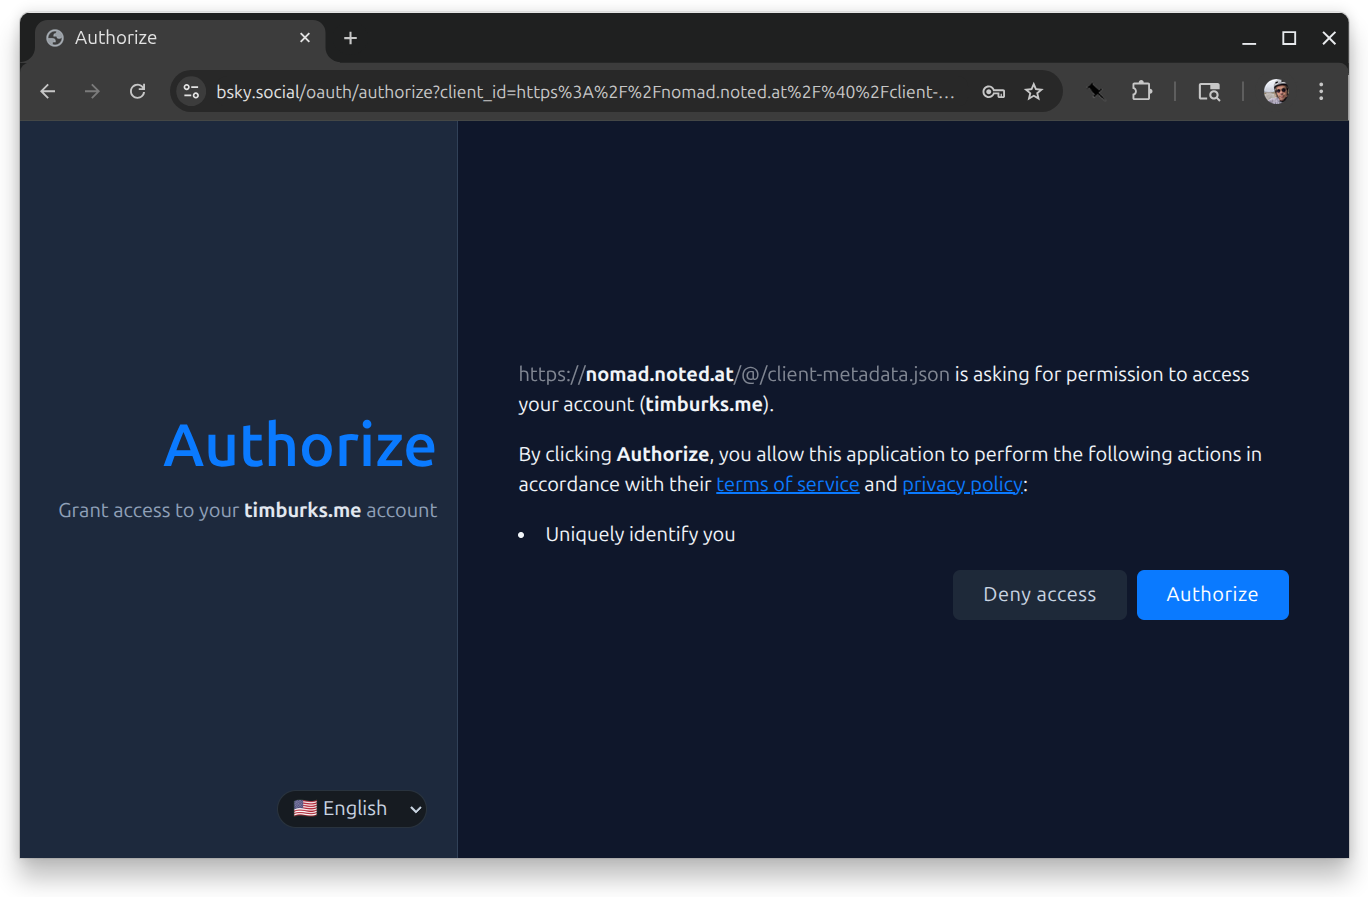
If you approve that, you'll be redirected back to your backend, which now is your droplet's Nomad console.

To sign out, just visit the /@/signout path of your console host. This and other special AT Protocol authorization features will be the topic of a future post!